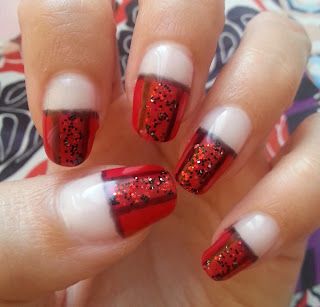
Lai izveidotu šādu dizainu, Tev būs nepieciešams: Bluesky shellac bāzes nagu laka un virskārta, gaiša shellac nagu laka pamatam, sarkana un melna shellac nagu laka, sarkani un melni nagu spīdumi.
1.) Sagatavo nagus shellac uzklāšanai.
2.) Uzklāj bāzes nagu laku (Bluesky shellac base coat) un nožāvē UV lampā.
3.) Uzklāj plānu kārtu gaišās nagu lakas (Bluesky Romantique) un nožāvē.
4.) Uzklāj sarkano nagu laku (Bluesky Wildfire), cik augstu vēlies, un nožāvē UV lampā. Atkārto šo punktu.
5.) Izmantojot mazu nagu dizaina otiņu uzvelc melnas līnijas (Bluesky Black Pool) un nožāvē UV lampā.
6.) Sajauc caurspīdīgu nagu laku (Bluesky top coat) ar sarkaniem un melniem spīdumiem un uzklāj starp līnijām. Nožāvē UV lampā.
7.) Uzklāj virskārtu (Bluesky top coat) uz visa naga (neaizmirsti arī nagu maliņas) un nožāvē. Atkārto vēlreiz.
8.) Notīri Shellac nagu lakas lipīgo slāni ar izvēlēto līdzekli. Uzklāj nagiem eļļiņu.
---
Simple red & black + glitter nail design.
To create this nail design you'll need: Bluesky shellac base and top coat nail polish, light color nail polish for base color, red & black shellac nail polishes, red & black nail art glitter.
1.) Prepare the nails.
2.) Apply thin coat of base nail polish (Bluesky shellac base coat) and let it dry (cure with UV lamp).
3.) Apply a coat of the lighter nail polish (Bluesky Romantique) and cure it.
4.) Apply red nail polish (Bluesky Wildfire) and cure it. Repeat this step.
5.) Using nail design brush draw black lines (Bluesky Black Pool) and cure them.
6.) Mix red and black glitter with Bluesky top coat nail polish and apply in the middle. Cure with UV lamp.
7.) Apply top coat (Bluesky) on your nails (don't forget the nail edge) and cure. Repeat this step.
8.) Remove the sticky layer and apply oil on your nails.


No comments:
Post a Comment