Showing posts with label manikīrs mājās. Show all posts

Saturday, August 24, 2013

Dark Orange

Un tā turpinot izmantot spīdumus...tapa šāds nagu dizains.

Nepieciešamais: Bluesky shellac bāzes nagu laka un virskārta, tumši brūngana un oranža  shellac nagu laka, oranži nagu spīdumi un tumši brūni dimantiņi.

Viss kā jau vienmēr sākas ar manikīru, tad tiek uzklāta shellac bāzes nagu laka. Uzklāj brūnās (Bluesky Dark Lava) un oranžās (Bluesky Hot Chillis) nagu lakas pirmo kārtu, pēc tam otro kārtu. Sajauc oranžos spīdumus ar caurspīdīgu nagu laku ( Bluesky top coat) un liek virs oranžās nagu lakas, pievieno dimantiņus (Swarovski). Visbeidzot, uzklāj virskārtu (Bluesky top coat) (2 kārtas uz nagiem ar spīdumiem). Notīrām lipīgo slāni un uzklājam eļļiņu.

---

Continuing to use glitter...and look what I made.

You will need: Bluesky shellac base and top coat nail polish, dark brownish and orange shellac nail polish, orange nail art glitter and dark brown rhinestones.

As always everything starts with manicure, then you apply shellac base coat. After that you can apply the first coat of dark brown (Bluesky Dark Lava) and orange (Bluesky Hot Chillis) nail polish, then second coat. Mix orange glitter with Bluesky top coat and apply on the orange nail polish, add the brown rhinestones (Swarovski). Finally, apply Bluesky top coat (2 coats on the nails with glitter). Remove the sticky layer and apply some oil on your nails.

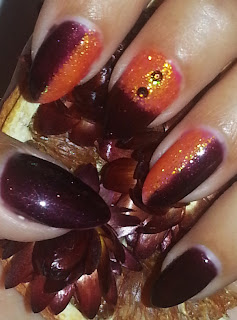

Dark Orange nail design, glitter, Swarovski rhinestones, shellac, Bluesky, Dark lava, Hot Chillis

Wednesday, July 17, 2013

Red & glitter nail design

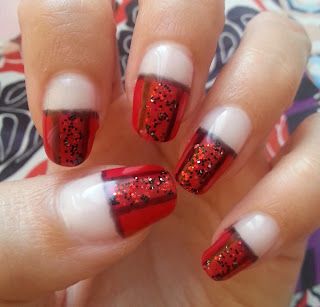
Vienkāršs sarkans ar melnu + spīdumi nagu dizains.

Lai izveidotu šādu dizainu, Tev būs nepieciešams: Bluesky shellac bāzes nagu laka un virskārta, gaiša shellac nagu laka pamatam, sarkana un melna shellac nagu laka, sarkani un melni nagu spīdumi.

1.) Sagatavo nagus shellac uzklāšanai.
2.) Uzklāj bāzes nagu laku (Bluesky shellac base coat) un nožāvē UV lampā.
3.) Uzklāj plānu kārtu gaišās nagu lakas (Bluesky Romantique) un nožāvē.
4.) Uzklāj sarkano nagu laku (Bluesky Wildfire), cik augstu vēlies, un nožāvē UV lampā. Atkārto šo punktu.
5.) Izmantojot  mazu nagu dizaina otiņu uzvelc melnas līnijas (Bluesky Black Pool) un nožāvē UV lampā.
6.) Sajauc caurspīdīgu nagu laku (Bluesky top coat) ar sarkaniem un melniem spīdumiem un uzklāj starp līnijām. Nožāvē UV lampā.
7.) Uzklāj virskārtu (Bluesky top coat) uz visa naga (neaizmirsti arī nagu maliņas) un nožāvē. Atkārto vēlreiz.
8.) Notīri Shellac nagu lakas lipīgo slāni ar izvēlēto līdzekli. Uzklāj nagiem eļļiņu.


---

Simple red & black + glitter nail design.

To create this nail design you'll need: Bluesky shellac base and top coat nail polish, light color nail polish for base color, red & black shellac nail polishes, red & black nail art glitter.

1.) Prepare the nails.
2.) Apply thin coat of base nail polish (Bluesky shellac base coat) and let it dry (cure with UV lamp).
3.) Apply a coat of the lighter nail polish (Bluesky Romantique) and cure it.
4.) Apply red nail polish (Bluesky Wildfire) and cure it. Repeat this step.
5.) Using nail design brush draw black lines (Bluesky Black Pool) and cure them.
6.) Mix red and black glitter with Bluesky top coat nail polish and apply in the middle. Cure with UV lamp.
7.) Apply top coat (Bluesky) on your nails (don't forget the nail edge) and cure. Repeat this step.
8.) Remove the sticky layer and apply oil on your nails.


shellac nail design, Bluesky, Wildfire, glitter, Black Pool, Romantique, red and black nail art

Thursday, May 30, 2013

Dari pati: shellac manikīrs/DIY: shellac manicure

Sveikas!
Vai esat kādreiz domājušas, cik naudas Jūs varētu ietaupīt, ja tā vietā, lai pieaudzētu nagus vai lakotu Gelish un Shellac nagu lakas salonos, Jūs to darītu pašas savās mājās? Atbilde ir - daudz!
---
Hi!
Have you ever thought how much money you could save, if you did your manicure at  home instead of beauty salons? I've got the answer - a lot!


necessary for shellac manicure, vajadzīgais shellac manikīram

Kas Jums nepieciešams, lai sāktu:
1.) UV vai LED lampa. Vajadzētu būt vismaz 36W. Ebay.com ir liela izvēle. Izmaksas no 12 Ls.
2.) Bluesky shellac starta komplekts (bāzes nagu laka, virskārta, dažādu krāsu nagu lakas). Arī var iegādāties Ebay.com vai Amazon.com. Izmaksas no 15 Ls.
3.) Lipīgā slāņa noņēmējs. Es izmantoju IBD Gelac gel cleanser. Iegādājos ŠEIT.
4.) Nagu lakas noņēmējs. Izmantoju IBD Gelac gel remover. Pirku tajā pašā veikalā, kur lipīgā slāņa noņēmēju. Komplektā šie abi maksāja 7.50 Ls.
5.) Manikīra komplekts, kas noteikti Jums jau ir.

Kopējās izmaksas 34.50 Ls pret Gelish vai Shellac manikīru salonā sākot no 10 Ls par reizi! Diezgan izdevīgi, vai ne? :)


---

What you need to get started:
1.) UV or LED lamp. You should choose at least 36W lamp. There's a wide range on Ebay.com. Costs from 24$.
2.) Bluesky shellac start kit (base coat, top coat and color nail polishes). You can find them on Ebay.com or Amazon.com. Costs from 30$.
3.) Sticky residue remover. I'm using IBD Gelac gel cleanser. (on Ebay.com 11.50$)
4.) Gel nail polish remover. I'm using  IBD Gelac gel remover. (on Ebay.com 7$)
5.) Manicure set, witch you already have.

Total costs: 72.50$ Pretty convenient, don't you think? :)

---

Cerams Jums patika šis raksts un rosināja vēlmi pašām izmēģināt Shellac manikīru! Nākošajos rakstos pastāstīšu, kāpēc izvēlos Bluesky shellac nagu lakas un kā tās lietot.

---

I hope you liked my post and you decide to try it yourself! In my next posts, I'll tell why I choose Bluesky shellac and how to use it.