Sunday, August 11, 2013

Pink glitter nails/ Mirdzoši rozā nagi

Vienkāršs nagu dizains, joprojām izmantojot spīdumus..

Nepieciešamais: Bluesky shellac bāzes nagu laka un virskārta, gaiša shellac nagu laka pamatam, rozā un gaiši nagu spīdumi un dimantiņi.

1.) Sagatavo nagus shellac uzklāšanai.
2.) Uzklāj bāzes nagu laku (Bluesky shellac base coat) un nožāvē UV lampā.
3.) Uzklāj plānu kārtu gaišās nagu lakas (Bluesky Romantique) un nožāvē. 
4.) Sajauc caurspīdīgu nagu laku (Bluesky top coat) ar rozā un gaišiem spīdumiem un uzklāj uz nagiem.Nožāvē UV lampā. Atkārto šo punktu un uzliec dimantiņus, nožāvē UV lampā.
5.) Uzklāj virskārtu (Bluesky top coat) un nožāvē. Atkārto vēlreiz.
6.) Notīri Shellac nagu lakas lipīgo slāni ar izvēlēto līdzekli. Uzklāj nagiem eļļiņu.

---

Easy nail design, still using glitter...

You will need: Bluesky shellac base and top coat nail polish, light color nail polish for base color, pink and clear nail art glitter and rhinestones.

1.) Prepare the nails.
2.) Apply thin coat of base nail polish (Bluesky shellac base coat) and let it dry (cure with UV lamp).
3.) Apply a coat of the lighter nail polish (Bluesky Romantique) and cure it.
4.) Mix pink and clear glitter with Bluesky top coat nail polish and apply to nails. Cure with UV lamp. Repeat this step and add rhinestones. Cure with UV lamp.
5.) Apply top coat on your nails and cure. Repeat this step.
6.) Remove the sticky layer and apply oil on your nails.


Pink glitter nails, mirdzoši rozā nagi, nagu spīdumi, Bluesky, Romantique, shellac

Saturday, July 20, 2013

Gold glitter & rhinestone nail design

Sveikas!

Jauns nagu dizains, izmantojot spīdumus (baigi iepatikušies :D ) un zelta dimantiņus.

Nepieciešamais: Bluesky shellac bāzes nagu laka un virskārta, gaiša shellac nagu laka pamatam, melna shellac nagu laka, zelta nagu spīdumi un dimantiņi.

1.) Sagatavo nagus shellac uzklāšanai.
2.) Uzklāj bāzes nagu laku (Bluesky shellac base coat) un nožāvē UV lampā.
3.) Uzklāj plānu kārtu gaišās nagu lakas (Bluesky Romantique) un nožāvē. Atkārto šo punktu.
4.) Slīpi līdz naga stūrim uzklāj melno nagu laku (Bluesky Black Pool) un nožāvē UV lampā. Atkārto šo punktu.
5.) Sajauc caurspīdīgu nagu laku (Bluesky top coat) ar zelta spīdumiem un uzklāj uz akcenta naga, kā arī pārējo nagu stūrīšiem (uz melnās nagu lakas zelta spīdumi izskatīsies zaļi). Nožāvē UV lampā. Atkārto šo punktu uz akcenta naga un pievieno zelta dimantiņus, nožāvē UV lampā.
6.) Uzklāj virskārtu (Bluesky top coat) uz visa naga (neaizmirsti arī nagu maliņas) un nožāvē. Atkārto vēlreiz.
7.) Notīri Shellac nagu lakas lipīgo slāni ar izvēlēto līdzekli. Uzklāj nagiem eļļiņu.

---

Hey!

New nail design using glitter (kinda loving them right now :D ) and gold rhinestones.

You will need: Bluesky shellac base and top coat nail polish, light color nail polish for base color, black shellac nail polish, gold nail art glitter and rhinestones.

1.) Prepare the nails.
2.) Apply thin coat of base nail polish (Bluesky shellac base coat) and let it dry (cure with UV lamp).
3.) Apply a coat of the lighter nail polish (Bluesky Romantique) and cure it. Repeat this step.
4.) Apply black nail polish from corner to the other side of the nail (Bluesky Black Pool) and cure it. Repeat this step.
5.) Mix gold glitter with Bluesky top coat nail polish and apply to accent nail and on the black nail polish corners (the gold glitter will look green). Cure with UV lamp. Repeat this step on accent nail and add gold rhinestones to the nails. Cure.
6.) Apply top coat (Bluesky) on your nails (don't forget the nail edge) and cure. Repeat this step.
7.) Remove the sticky layer and apply oil on your nails.


Gold glitter accent nail, black french manicure, zelta spīdumu manikīrs, nagu dizains, Bluesky shellac, rhinestones, Romantique, Black Pool

Wednesday, July 17, 2013

Red & glitter nail design

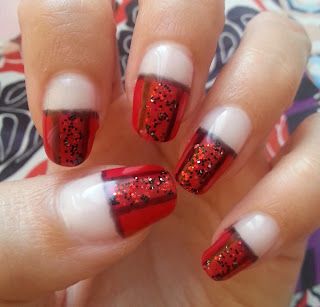
Vienkāršs sarkans ar melnu + spīdumi nagu dizains.

Lai izveidotu šādu dizainu, Tev būs nepieciešams: Bluesky shellac bāzes nagu laka un virskārta, gaiša shellac nagu laka pamatam, sarkana un melna shellac nagu laka, sarkani un melni nagu spīdumi.

1.) Sagatavo nagus shellac uzklāšanai.
2.) Uzklāj bāzes nagu laku (Bluesky shellac base coat) un nožāvē UV lampā.
3.) Uzklāj plānu kārtu gaišās nagu lakas (Bluesky Romantique) un nožāvē.
4.) Uzklāj sarkano nagu laku (Bluesky Wildfire), cik augstu vēlies, un nožāvē UV lampā. Atkārto šo punktu.
5.) Izmantojot  mazu nagu dizaina otiņu uzvelc melnas līnijas (Bluesky Black Pool) un nožāvē UV lampā.
6.) Sajauc caurspīdīgu nagu laku (Bluesky top coat) ar sarkaniem un melniem spīdumiem un uzklāj starp līnijām. Nožāvē UV lampā.
7.) Uzklāj virskārtu (Bluesky top coat) uz visa naga (neaizmirsti arī nagu maliņas) un nožāvē. Atkārto vēlreiz.
8.) Notīri Shellac nagu lakas lipīgo slāni ar izvēlēto līdzekli. Uzklāj nagiem eļļiņu.


---

Simple red & black + glitter nail design.

To create this nail design you'll need: Bluesky shellac base and top coat nail polish, light color nail polish for base color, red & black shellac nail polishes, red & black nail art glitter.

1.) Prepare the nails.
2.) Apply thin coat of base nail polish (Bluesky shellac base coat) and let it dry (cure with UV lamp).
3.) Apply a coat of the lighter nail polish (Bluesky Romantique) and cure it.
4.) Apply red nail polish (Bluesky Wildfire) and cure it. Repeat this step.
5.) Using nail design brush draw black lines (Bluesky Black Pool) and cure them.
6.) Mix red and black glitter with Bluesky top coat nail polish and apply in the middle. Cure with UV lamp.
7.) Apply top coat (Bluesky) on your nails (don't forget the nail edge) and cure. Repeat this step.
8.) Remove the sticky layer and apply oil on your nails.


shellac nail design, Bluesky, Wildfire, glitter, Black Pool, Romantique, red and black nail art

Thursday, June 27, 2013

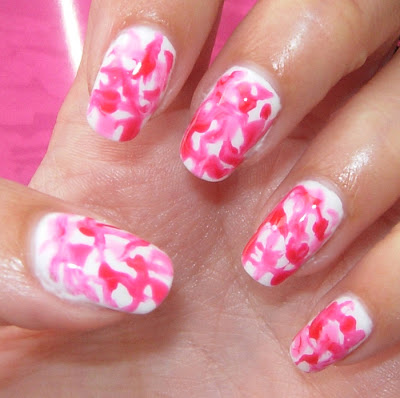
Krāsu mix nagu dizains/ Splash nail art

Čau!

Šonedēļ vēlējos gaišu, bet krāsainu nagu dizainu. Lūk, kas man sanāca. :)

Nepieciešamais: Bluesky shellac bāzes nagu laka un virskārta, gaiša shellac nagu laka pamatam, trīs līdzīgu toņu shellac nagu lakas.

1.) Sagatavo nagus shellac uzklāšanai.
2.) Uzklāj bāzes nagu laku (Bluesky shellac base coat) un nožāvē UV lampā.
3.) Uzklāj plānu kārtu gaišās nagu lakas (Bluesky Studio white) un nožāvē. Tad atkārto šo punktu vēlreiz.
4.) Ar nagu lakas otiņu saliec punktiņus, izmantojot 3 nagu lakas. Es izmantoju Bluesky Hot Chillis (sarkani oranžīga krāsa), Wildfire (klasiski sarkana), Gotchya (gaiši rozā). Izmantojot  mazu nagu dizaina otiņu sapludini krāsas un nožāvē UV lampā.
5.) Uzklāj virskārtu (Bluesky top coat) uz visa naga (neaizmirsti arī nagu maliņas) un nožāvē.
6.) Notīri Shellac nagu lakas lipīgo slāni ar izvēlēto līdzekli. Uzklāj nagiem eļļiņu.

---

Hey!

This week I wanted light, but colorful nail design, so this is what I came up with. :)

You'll need: Bluesky shellac base and top coat nail polish, light color nail polish for base color, three similar color shellac nail polishes.

1.) Prepare the nails.
2.) Apply thin coat of base nail polish (Bluesky shellac base coat) and let it dry (cure with UV lamp).
3.) Apply a coat of the lighter nail polish (Bluesky Studio White) and cure it, then repeat this step.
4.) Apply dots of your 3 nail polishes with nail polish brush. I used Bluesky Hot Chillis (watermelon color), Wildfire (classic red), Gotchya (bright baby pink). With small nail art brush mix the color dots and cure in UV lamp.
5.) Apply top coat (Bluesky) on your nails (don't forget the nail edge) and cure.
6.) Remove the sticky layer and apply oil on your nails.

Bluesky shellac nail polish, Studio white, Gotchya, Wildfire, Hot Chillis, colorful, shellac manikīrs, krāsains nagu dizains


Thursday, June 20, 2013

Vienkāršs nagu dizains/ Simple nail design

Sveikas!

Mans šīs nedēļas Shellac manikīrs - balts & zils nagu dizains.

Nepieciešamais: Bluesky shellac bāzes nagu laka un virskārta, gaiša shellac nagu laka pamatam, tumša shellac nagu laka un nagu spīdumi (pieskaņoti tumšajai nagu lakai).

1.) Sagatavo nagus shellac uzklāšanai (novīlēt, var nospodrināt ar nagu buferi utt.).
2.) Uzklāj bāzes nagu laku (Bluesky shellac base coat) un nožāvē UV lampā.
3.) Uzklāj plānu kārtu gaišas nagu lakas (Bluesky Studio White) un nožāvē, pēc tam uzklāj otru kārtu šīs pašas nagu lakas un nožāvē.
4.) Uzklāj tumšo nagu laku vēlamajā augstumā (Bluesky Midnight Swim) un nožāvē, atkārto vēlreiz.
5.) Sajauc uz lapiņas caurspīdīgu nagu laku (Bluesky top coat) ar ziliem nagu spīdumiem un uzklāj uz nagiem, nožāvē.
6.) Uzklāj virskārtu (Bluesky top coat) uz visa naga un nožāvē UV lampā.
7.) Notīri Shellac nagu lakas lipīgo slāni ar izvēlēto līdzekli.
8.) Uzklāj uz nagiem eļļu (es lietoju mandeļu eļļu vai bišu vaskus, kas nopērkami Drogās).

---

Hi!

This weeks Shellac manicure - white & blue nail design.

You'll need: Bluesky shellac base and top coat nail polish, light color nail polish for base color, darker shellac nail polish and nail glitter (matching the darker nail polish).

1.) Prepare the nails (manicure, cuticles, buff them etc.).
2.) Apply thin coat of base nail polish (Bluesky shellac base coat) and let it dry (cure with UV lamp).
3.) Apply a coat of the lighter nail polish (Bluesky Studio White) and cure it, then repeat this step.
4.) Apply the darker nail polish (Bluesky Midnight Swim) and cure it, repeat this step.
5.) Mix clear nail polish (Bluesky top coat) with nail glitters and apply on the dark nail polish, cure it.
6.) Apply top coat (Bluesky) on your nails and cure with UV lamp.
7.) Remove the sticky layer.
8.) Apply oil on your finished nails (I'm using almond oil).


white & blue nail design, Blats & zils nagu dizains, shellac, Bluesky, Midnight Swim, Studio White, glitter